> ## Documentation Index
> Fetch the complete documentation index at: https://help.ip2up.com/llms.txt
> Use this file to discover all available pages before exploring further.
# API Whitelist
All proxy products of the platform need to be used in an overseas network environment, which requires customers to configure themselves.
This article will introduce how to configure the **API Whitelist** for dynamic residential proxies on the **Ip2up platform** to securely obtain proxy information via the API interface.
### 1. Select Whitelist
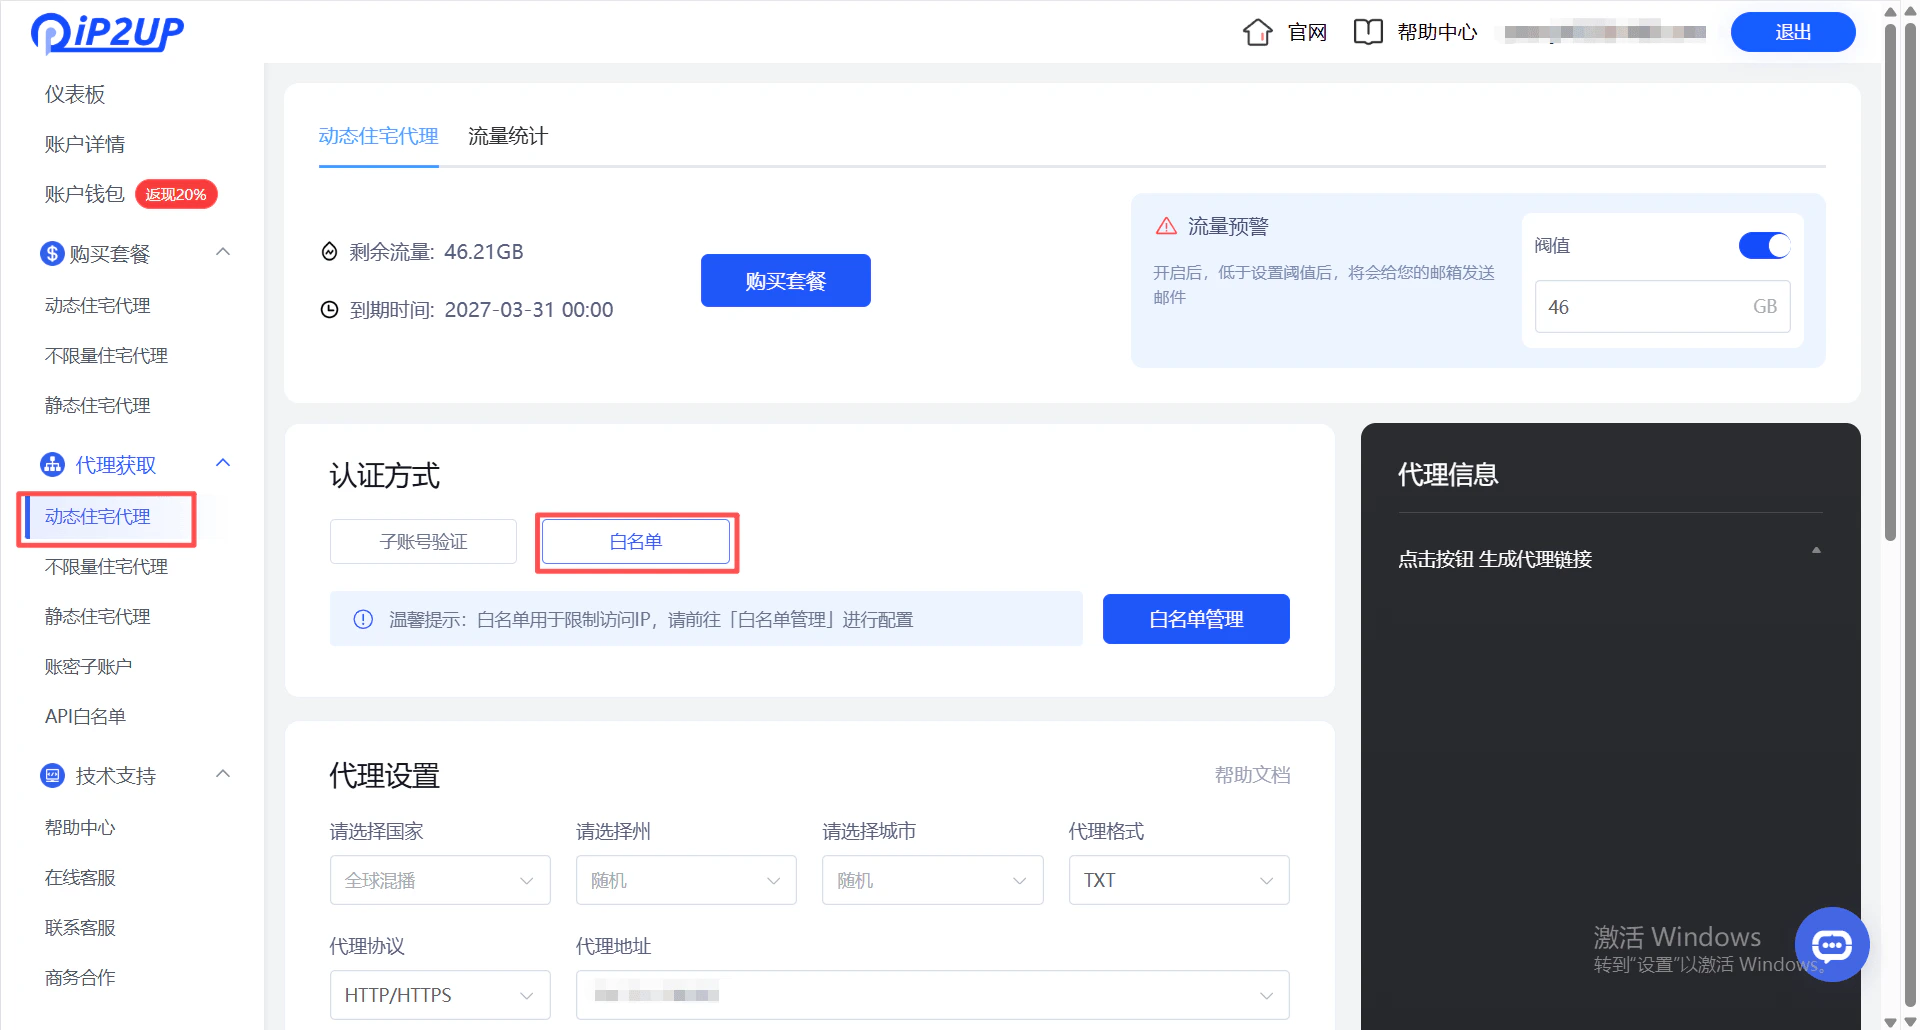
After logging into the **Ip2up** platform, click **Dynamic Residential Proxy** in the left menu, then select the **Whitelist** option in the interface.
 ### 2. Manage Whitelist
**2.1 Add to Whitelist**
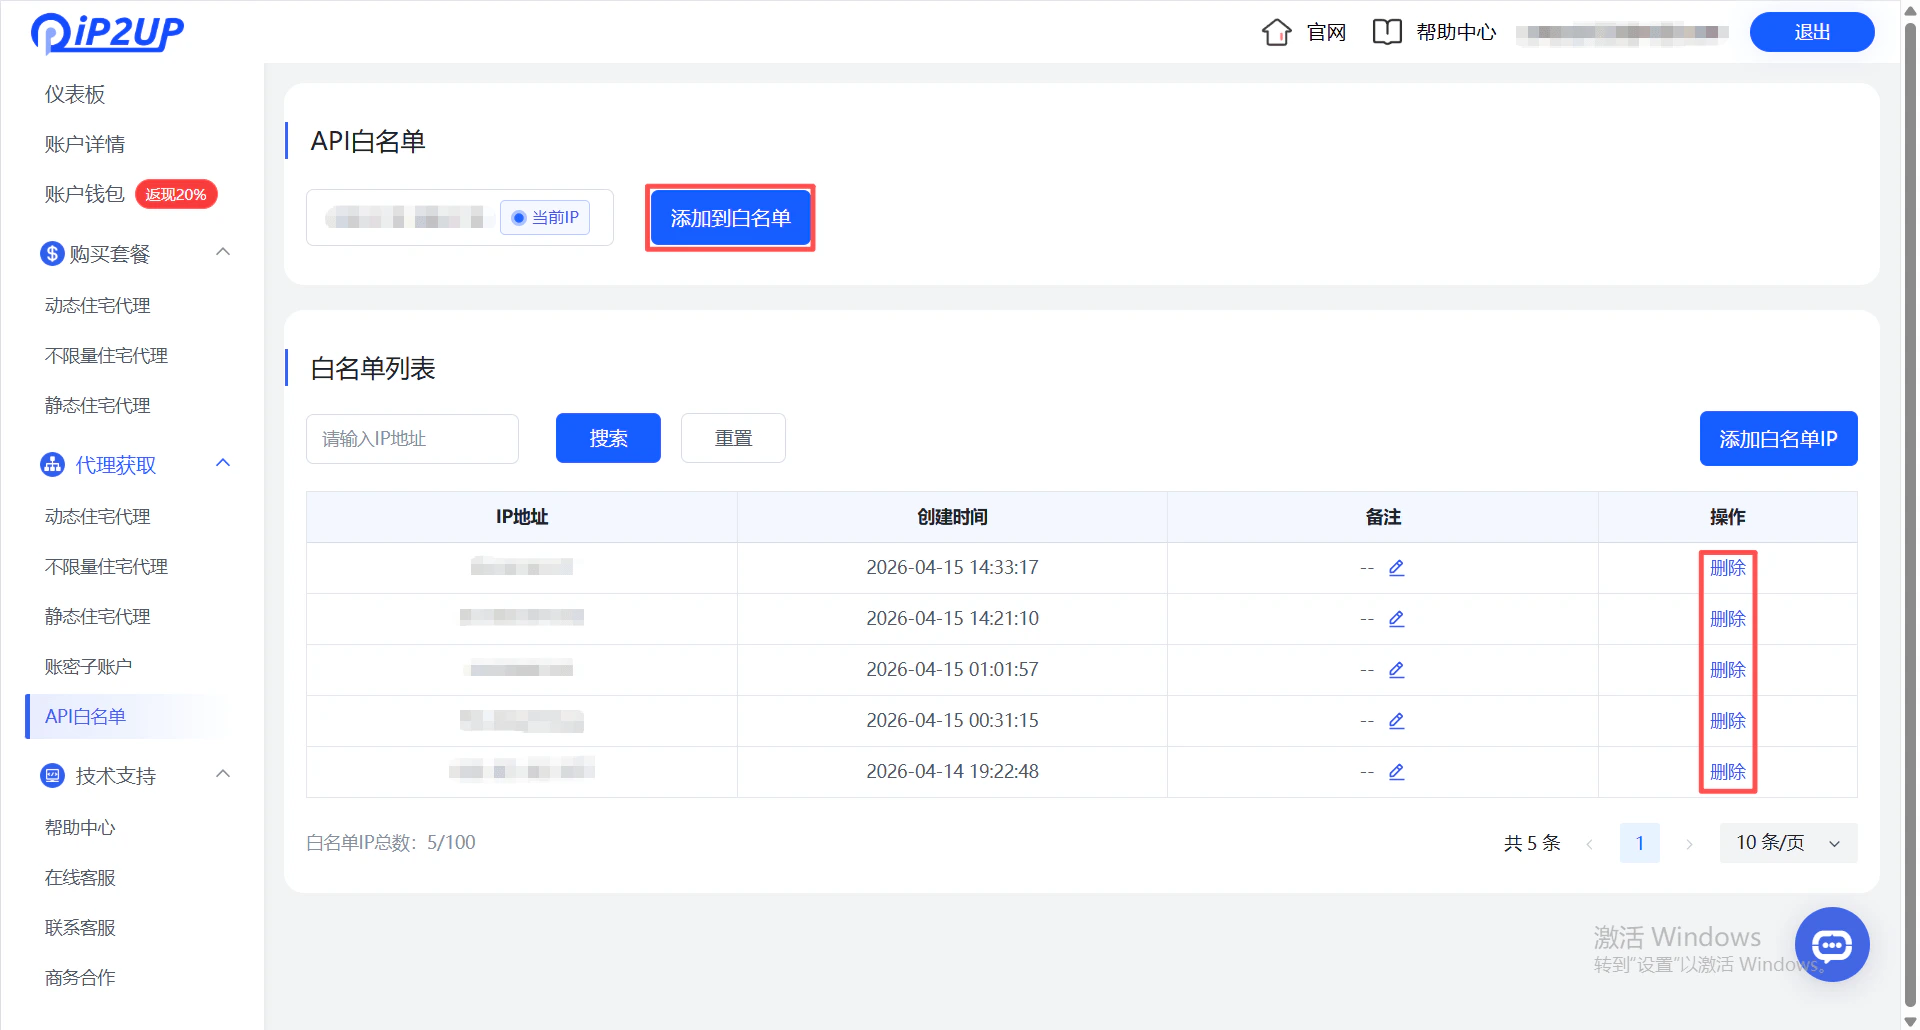
Click the **Add to Whitelist** button, and the system will automatically add your current public IP address to the whitelist.
**2.2 Delete Whitelist IP**
In the whitelist list, find the IP address you want to delete and click the **Delete** button on the right to remove it.
### 2. Manage Whitelist
**2.1 Add to Whitelist**
Click the **Add to Whitelist** button, and the system will automatically add your current public IP address to the whitelist.
**2.2 Delete Whitelist IP**
In the whitelist list, find the IP address you want to delete and click the **Delete** button on the right to remove it.
 **2.3 Batch Add to Whitelist**
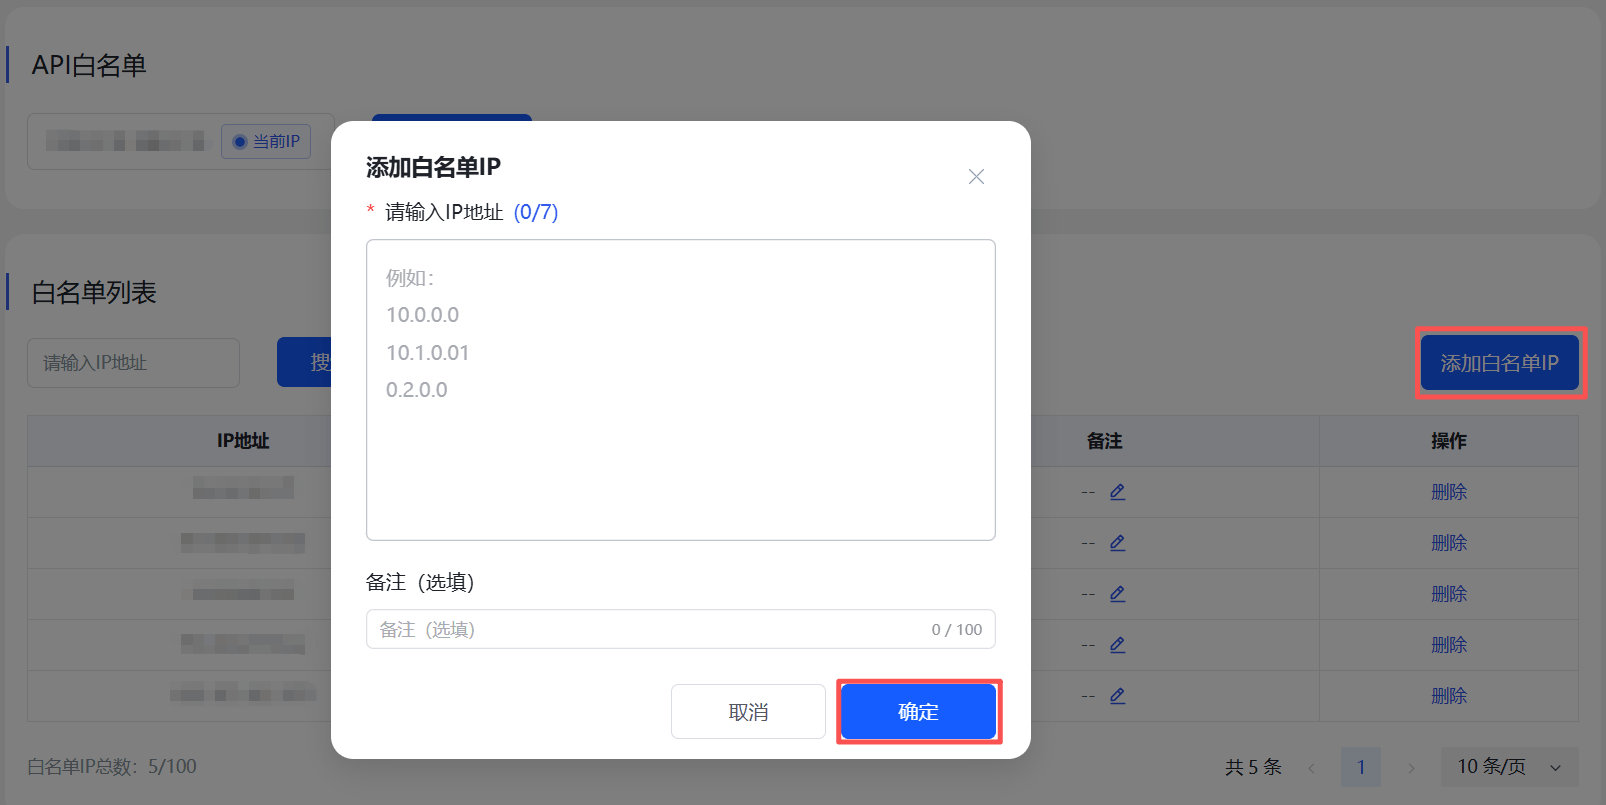
To manually add multiple IP addresses:
* Enter IP addresses in the input box (one per line)
* Optionally add remarks for identification and management
* Click the **Confirm** button to complete the addition
**2.3 Batch Add to Whitelist**
To manually add multiple IP addresses:
* Enter IP addresses in the input box (one per line)
* Optionally add remarks for identification and management
* Click the **Confirm** button to complete the addition
 ### 3. Configure Proxy Parameters
**API Parameter Description**
| Parameter | Type | Required | Description |
| :-----------: | :----: | :------: | :----------------------------------------------------------------------- |
| `mode` | string | Yes | Session type: `rotating` (rotating IP), `sticky` (sticky IP) |
| `host` | string | Yes | Proxy gateway address |
| `protocol` | string | Yes | Proxy protocol: `http` or `socks5` |
| `country` | string | No | Country code, e.g., `US` (random if not specified) |
| `state` | string | No | State/region code, e.g., `AK` (must be used with country) |
| `city` | string | No | City name, e.g., `Bethel` (must be used with country and state) |
| `count` | int | Yes | Number of proxies to generate, supports any integer from **1 to 100** |
| `format` | string | Yes | Output format: `txt` (text format), `json` (JSON format) |
| `sessionTime` | int | No | Sticky IP duration (minutes), **1 to 70**, only valid when `mode=sticky` |
**Configuration Steps**
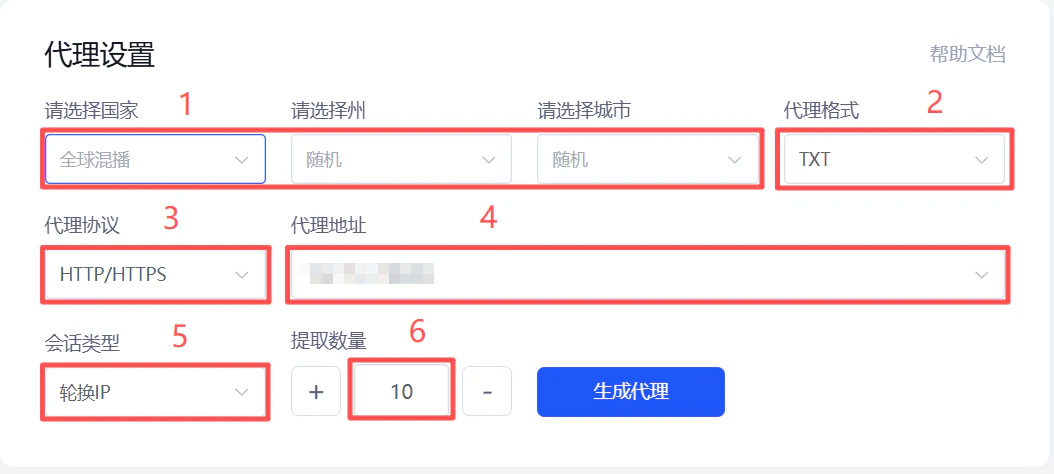
**3.1 Select Geographic Location**
* Select a specific **country/region**
* Or select **Random Location** to be automatically assigned by the system
**3.2 Select Proxy Format**
* **TXT**: Text format
* **JSON**: JSON format
**3.3 Select Proxy Protocol**
Supports **HTTP** and **SOCKS5** proxy protocols. Please choose based on your actual usage scenario.
**3.4 Select Proxy Address**
The system will automatically assign an available proxy gateway address based on your configuration.
**3.5 Configure Session Type**
* **Rotating IP**: Automatically changes IP address with each new request
* **Sticky IP**: Maintains the same IP address for a duration of **1 to 70 minutes**
**3.6 Set Generation Quantity**
Select the number of proxies to generate, supports any integer between **1 and 100**.
### 3. Configure Proxy Parameters
**API Parameter Description**
| Parameter | Type | Required | Description |
| :-----------: | :----: | :------: | :----------------------------------------------------------------------- |
| `mode` | string | Yes | Session type: `rotating` (rotating IP), `sticky` (sticky IP) |
| `host` | string | Yes | Proxy gateway address |
| `protocol` | string | Yes | Proxy protocol: `http` or `socks5` |
| `country` | string | No | Country code, e.g., `US` (random if not specified) |
| `state` | string | No | State/region code, e.g., `AK` (must be used with country) |
| `city` | string | No | City name, e.g., `Bethel` (must be used with country and state) |
| `count` | int | Yes | Number of proxies to generate, supports any integer from **1 to 100** |
| `format` | string | Yes | Output format: `txt` (text format), `json` (JSON format) |
| `sessionTime` | int | No | Sticky IP duration (minutes), **1 to 70**, only valid when `mode=sticky` |
**Configuration Steps**
**3.1 Select Geographic Location**
* Select a specific **country/region**
* Or select **Random Location** to be automatically assigned by the system
**3.2 Select Proxy Format**
* **TXT**: Text format
* **JSON**: JSON format
**3.3 Select Proxy Protocol**
Supports **HTTP** and **SOCKS5** proxy protocols. Please choose based on your actual usage scenario.
**3.4 Select Proxy Address**
The system will automatically assign an available proxy gateway address based on your configuration.
**3.5 Configure Session Type**
* **Rotating IP**: Automatically changes IP address with each new request
* **Sticky IP**: Maintains the same IP address for a duration of **1 to 70 minutes**
**3.6 Set Generation Quantity**
Select the number of proxies to generate, supports any integer between **1 and 100**.
 ### 4. Generate and Obtain Proxy Information
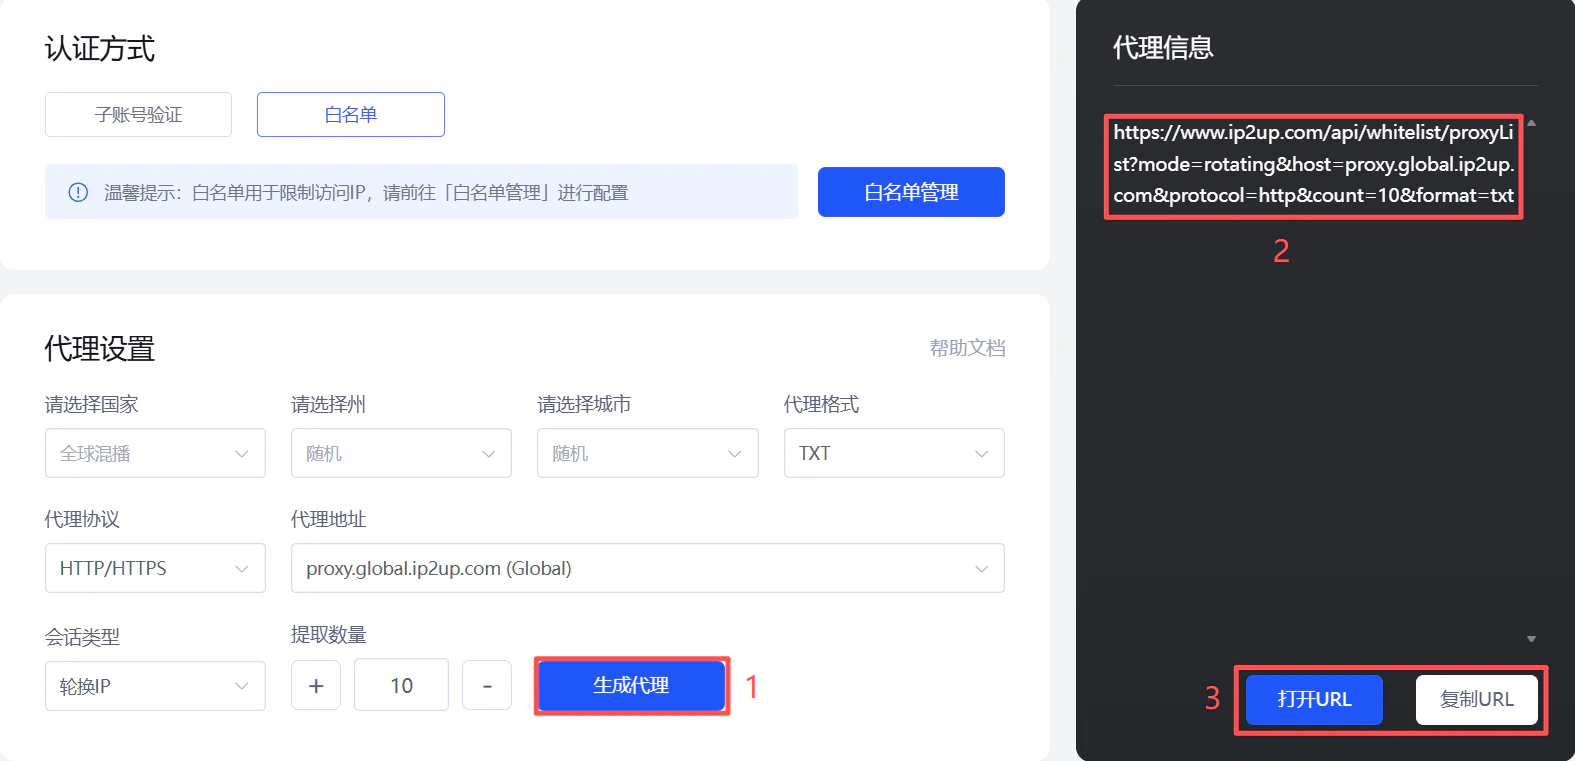
1. Click the **Generate Proxy** button
2. In the **Proxy Information** area on the right, the system will display the generated proxy information based on the above configuration
3. After successful generation, you can:
* Directly click **Open URL** to view the generated proxy list in your browser
* Or click **Copy URL** to get the API link for programmatic use
### 4. Generate and Obtain Proxy Information
1. Click the **Generate Proxy** button
2. In the **Proxy Information** area on the right, the system will display the generated proxy information based on the above configuration
3. After successful generation, you can:
* Directly click **Open URL** to view the generated proxy list in your browser
* Or click **Copy URL** to get the API link for programmatic use
 ✅ **At this point, you have successfully configured the API whitelist for dynamic residential proxies and can obtain proxy information via the API link.**