> ## Documentation Index
> Fetch the complete documentation index at: https://help.ip2up.com/llms.txt
> Use this file to discover all available pages before exploring further.
# Clash
All proxy products on the platform must be used in an overseas network environment. Users are required to configure the overseas network environment on their own.
This article provides a detailed guide on how to use the **Clash Verge client** to deploy **Static Residential IPs** via chained proxy configuration, enabling a more stable and secure network access environment.
The usage method for Dynamic Residential IPs is the same as that for Static Residential IPs.
### Step 1: Preparation
**1. Download the Software**
Download and install the appropriate version of the Clash Verge client based on your operating system. **(Demonstration system: Windows 10)**
**2. Prepare the Required Information**
* Users must configure an overseas network environment on their own
* **Static Residential IP information**: Obtain the following details from [Ip2up](https://www.Ip2up.com/):
* Server address
* Port number
* Username
* Password
### Step 2: Add an Overseas Subscription
1. Open Clash Verge and click **Subscription** in the left sidebar.
2. Click **Add Subscription**, paste your overseas subscription link into the input box, and save it.
3. After updating the subscription, go to **Settings** → **Profile Management**, locate the `config-verge.yaml` file in the local folder, and open it with a text editor for editing. **It is recommended to make a backup copy before editing**.
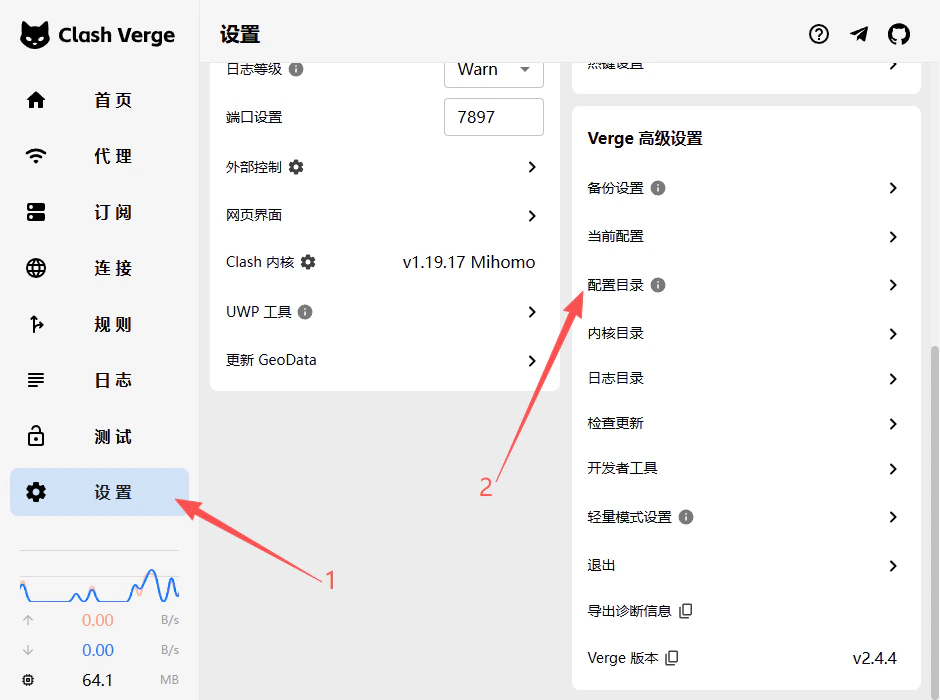
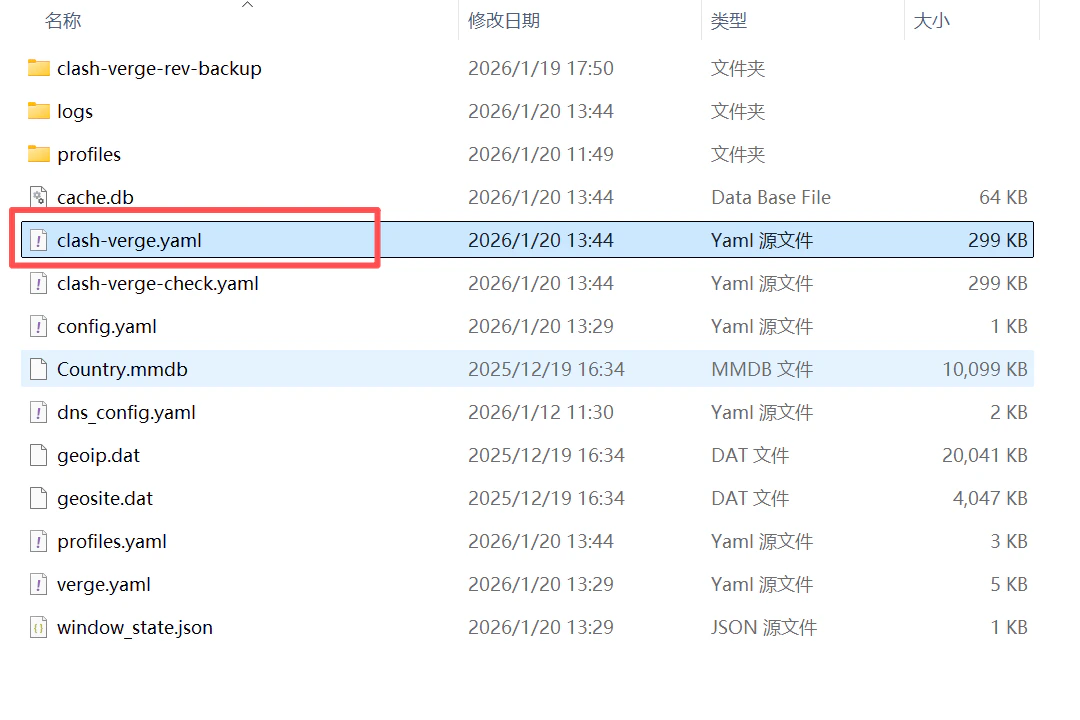 In the configuration file, you will see node information similar to the following:
```yaml theme={null}
proxies:
- name: "Node Name"
server: "Server Address"
port: Port
type: Protocol Type
cipher: Encryption Method
password: "Password"
```
Each node in the configuration file includes the following required parameters:
* **name** – Display name of the node
* **server** – Server address (IP or domain)
* **port** – Connection port
* **type** – Protocol type (e.g., trojan, vmess, shadowsocks)
* **cipher** – Encryption method
* **password** – Authentication password
### Step 3: Modify the Configuration File
Add the following two types of nodes in the `proxies:` section of the configuration file to create a chained proxy structure:
```yaml config.yaml theme={null}
proxies:
# Type A: Entry node (overseas node)
- name: Entry Node
type: Protocol Type
server: Server Address
port: Port
cipher: Encryption Method
password: Password
udp: true
# Type B: Chained exit (Static Residential IP)
- name: Static Proxy
type: http
server: Static IP Address
port: Port
username: Username
password: Password
udp: true
dialer-proxy: Entry Node
proxy-groups:
- name: Chained Proxy
type: select
proxies:
- Entry Node
- Static Proxy
```
**Notes for Filling In:**
* **Entry Node**:Replace with your stable overseas node that supports UDP
* **Static Proxy**:Replace with the Static Residential IP information obtained from [Ip2up](https://www.Ip2up.com/)
* **dialer-proxy: "Entry Node"**:It indicates that the static proxy will connect through the **"Entry Node"** , forming a chained proxy
### Step 4: Import the Configuration
**1. Import the Configuration File**
Save the modified configuration file as config.yaml and import it using one of the following methods:
**Method 1: Drag and Drop**
Directly drag the `config.yaml` file into the Clash Verge main interface
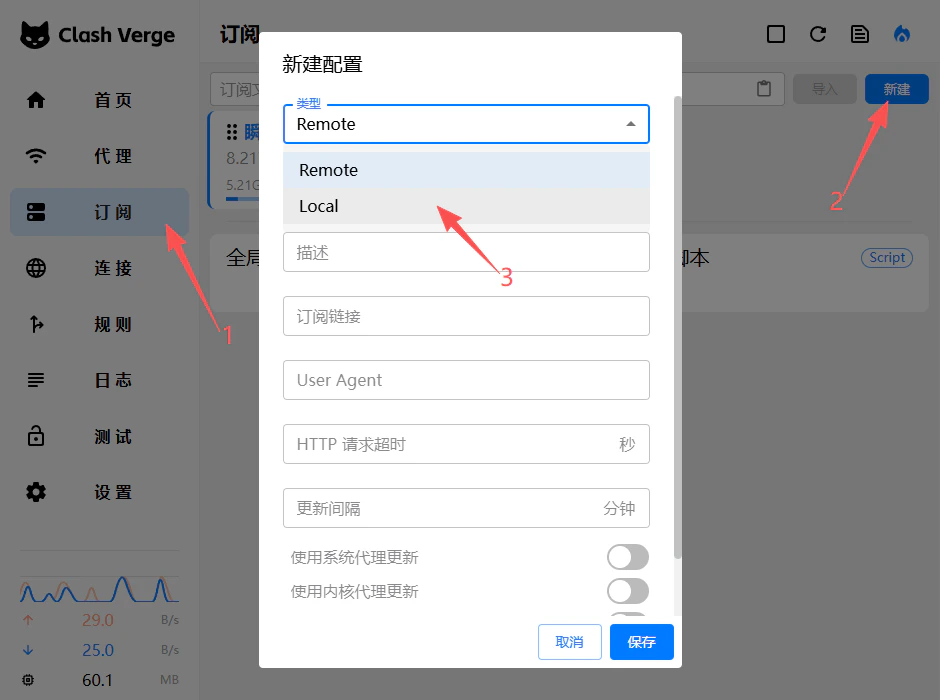
**Method 2: Manual Import**
1. Click **「Proxy」** in the left sidebar
2. Click the **「New」** button
3. Select **「Local」** as the type
4. Click **「Select File」**, locate and choose your `config.yaml` file, **the file name can be customized**
In the configuration file, you will see node information similar to the following:
```yaml theme={null}
proxies:
- name: "Node Name"
server: "Server Address"
port: Port
type: Protocol Type
cipher: Encryption Method
password: "Password"
```
Each node in the configuration file includes the following required parameters:
* **name** – Display name of the node
* **server** – Server address (IP or domain)
* **port** – Connection port
* **type** – Protocol type (e.g., trojan, vmess, shadowsocks)
* **cipher** – Encryption method
* **password** – Authentication password
### Step 3: Modify the Configuration File
Add the following two types of nodes in the `proxies:` section of the configuration file to create a chained proxy structure:
```yaml config.yaml theme={null}
proxies:
# Type A: Entry node (overseas node)
- name: Entry Node
type: Protocol Type
server: Server Address
port: Port
cipher: Encryption Method
password: Password
udp: true
# Type B: Chained exit (Static Residential IP)
- name: Static Proxy
type: http
server: Static IP Address
port: Port
username: Username
password: Password
udp: true
dialer-proxy: Entry Node
proxy-groups:
- name: Chained Proxy
type: select
proxies:
- Entry Node
- Static Proxy
```
**Notes for Filling In:**
* **Entry Node**:Replace with your stable overseas node that supports UDP
* **Static Proxy**:Replace with the Static Residential IP information obtained from [Ip2up](https://www.Ip2up.com/)
* **dialer-proxy: "Entry Node"**:It indicates that the static proxy will connect through the **"Entry Node"** , forming a chained proxy
### Step 4: Import the Configuration
**1. Import the Configuration File**
Save the modified configuration file as config.yaml and import it using one of the following methods:
**Method 1: Drag and Drop**
Directly drag the `config.yaml` file into the Clash Verge main interface
**Method 2: Manual Import**
1. Click **「Proxy」** in the left sidebar
2. Click the **「New」** button
3. Select **「Local」** as the type
4. Click **「Select File」**, locate and choose your `config.yaml` file, **the file name can be customized**
 ### Step 5: Testing and Usage
**1. Enable the Configuration File**
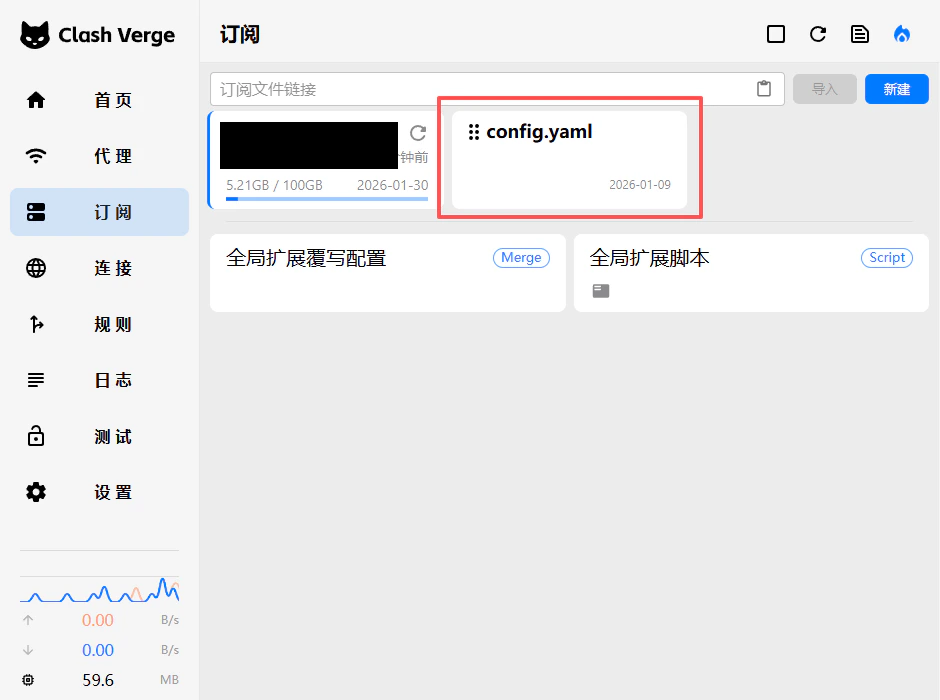
1. Click **「Subscription」** in the left sidebar
2. Find the newly added configuration file in the list
3. Click the **「Start」** button on the right
### Step 5: Testing and Usage
**1. Enable the Configuration File**
1. Click **「Subscription」** in the left sidebar
2. Find the newly added configuration file in the list
3. Click the **「Start」** button on the right
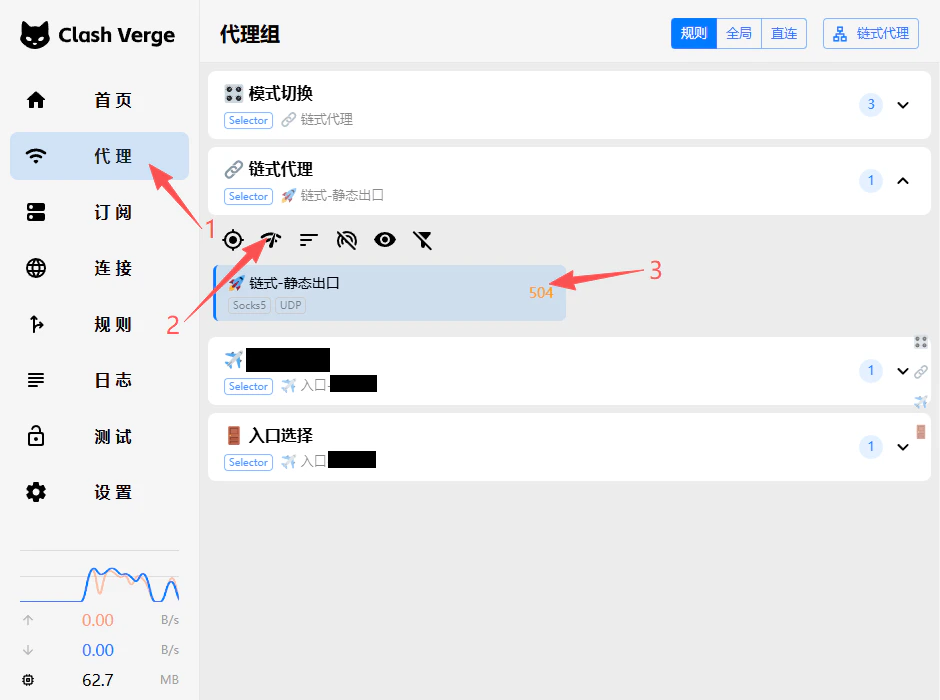
 **2. Test Proxy Connectivity**
1. Switch to the **「Proxy」** page
2. Locate **「Chained Proxy」** in the list
3. Check whether a latency value is displayed on the right (a displayed value indicates a successful connection)
**2. Test Proxy Connectivity**
1. Switch to the **「Proxy」** page
2. Locate **「Chained Proxy」** in the list
3. Check whether a latency value is displayed on the right (a displayed value indicates a successful connection)
 **3. Select Proxy Mode**
At the top of the Clash Verge main interface, you can choose one of the following modes:
* **Rule Mode**:Intelligent traffic routing based on predefined rules
* **Global Mode**:All traffic is forwarded through the proxy
✅ **At this point, the Clash Verge chained proxy configuration has been successfully completed, allowing secure and stable access to target websites via a Static Residential IP.**
**3. Select Proxy Mode**
At the top of the Clash Verge main interface, you can choose one of the following modes:
* **Rule Mode**:Intelligent traffic routing based on predefined rules
* **Global Mode**:All traffic is forwarded through the proxy
✅ **At this point, the Clash Verge chained proxy configuration has been successfully completed, allowing secure and stable access to target websites via a Static Residential IP.**