> ## Documentation Index
> Fetch the complete documentation index at: https://help.ip2up.com/llms.txt
> Use this file to discover all available pages before exploring further.
# v2rayN
All proxy products on the platform must be used in an overseas network environment. Users are required to configure the overseas network environment on their own.
This guide will walk you through configuring **static residential proxies** on Windows using a chained proxy setup with **v2rayN** and **Clash Verge**, for a more secure network access environment.
The usage method for Dynamic Residential IPs is the same as that for Static Residential IPs.
### Step 1: Preparation
**System & Software Requirements**
* **Operating System**: Windows (this tutorial uses Windows)
* **Installed Software**:
* Clash Verge (basic configuration completed)
* v2rayN (latest version)
**Required Proxy Information**
Obtain static residential proxy details from [Ip2up](https://www.Ip2up.com/):
* Server address
* Port
* Username
* Password
### Step 2: v2rayN Configuration
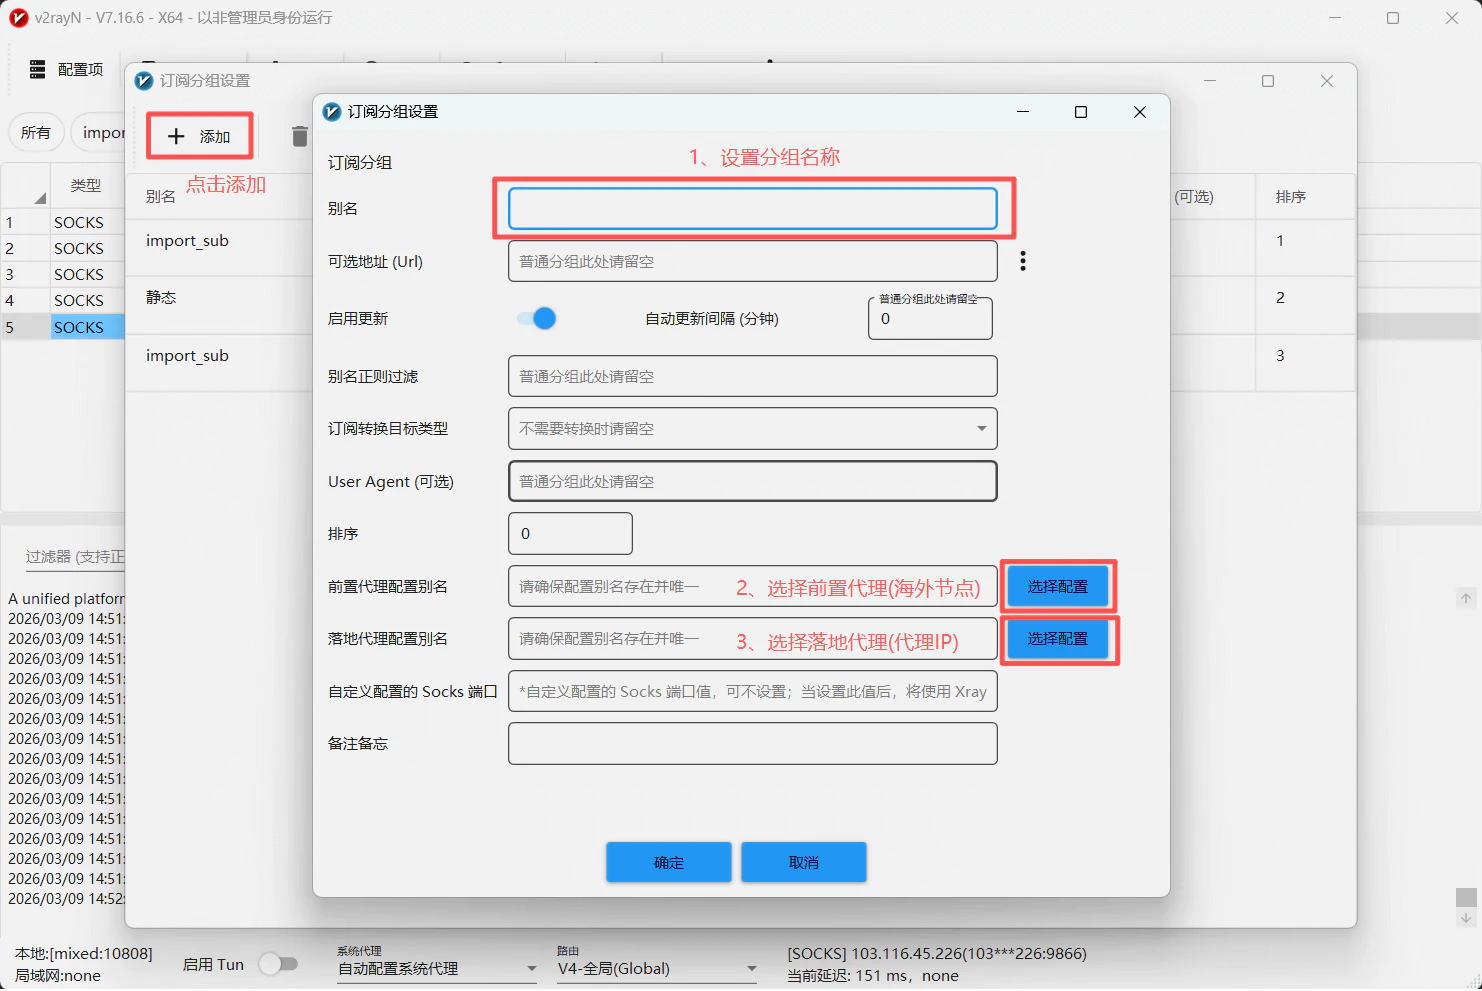
**1. Add Subscription Group**
1. Open the v2rayN application
2. Go to the top menu and select **Subscription Groups**
3. Click **Add**
4. Fill in the group details:
* **Group Name**: Custom group identifier
* **Upstream Proxy**: Select an overseas node (for connecting to the overseas environment)
* **Exit Proxy**: Enter your Ip2up proxy details
 **2. Add Proxy Configuration**
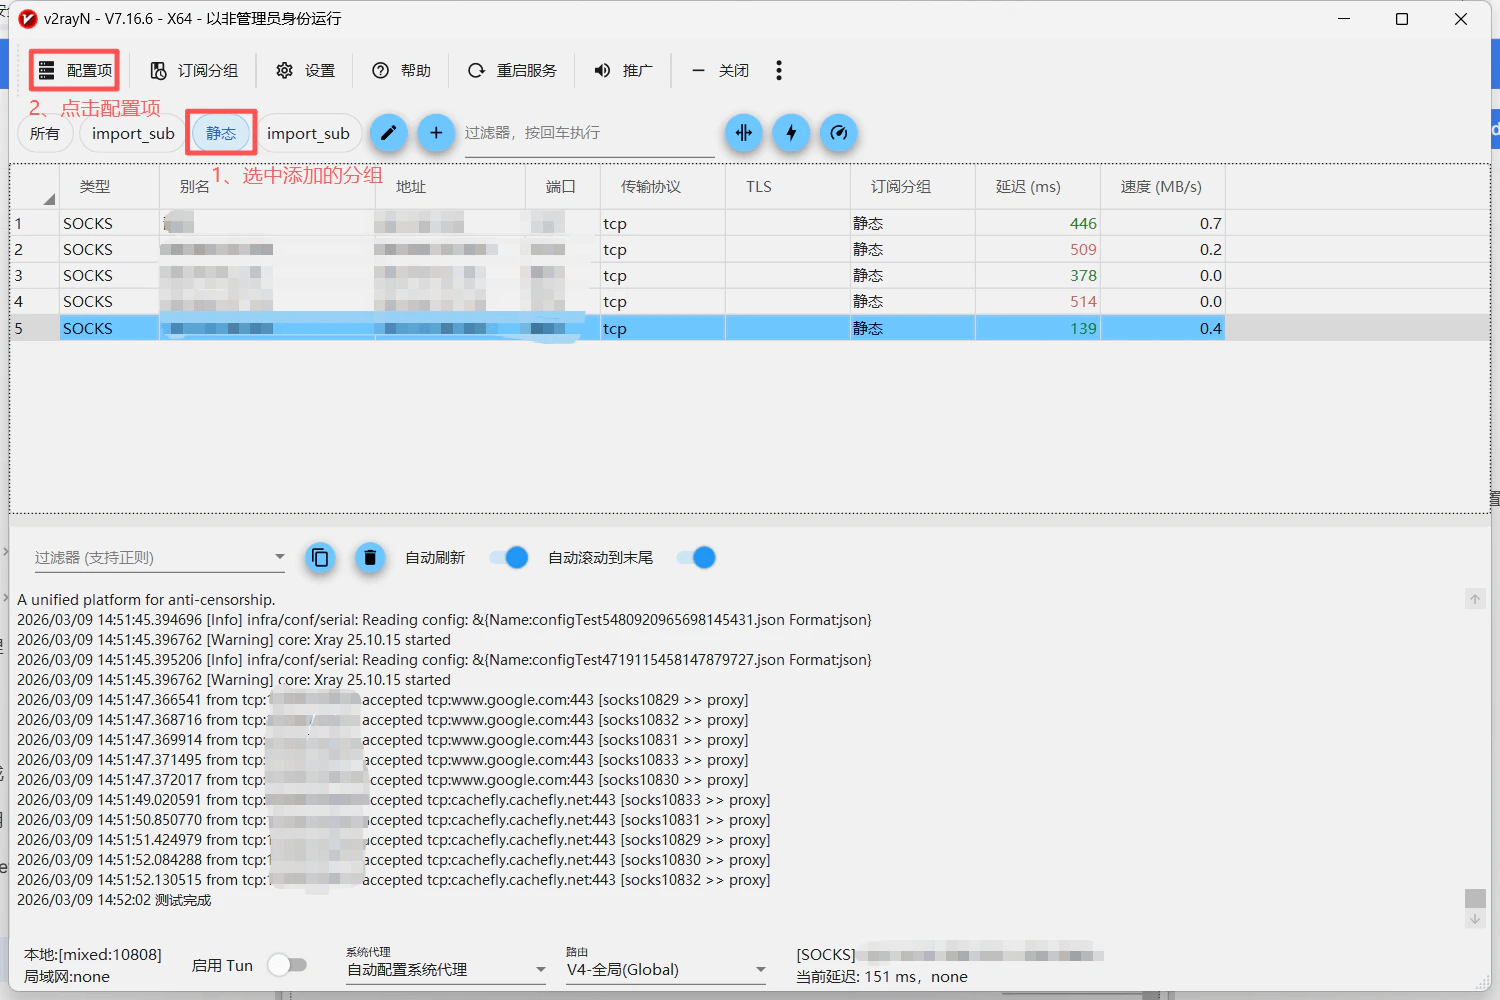
1. Select the newly created group
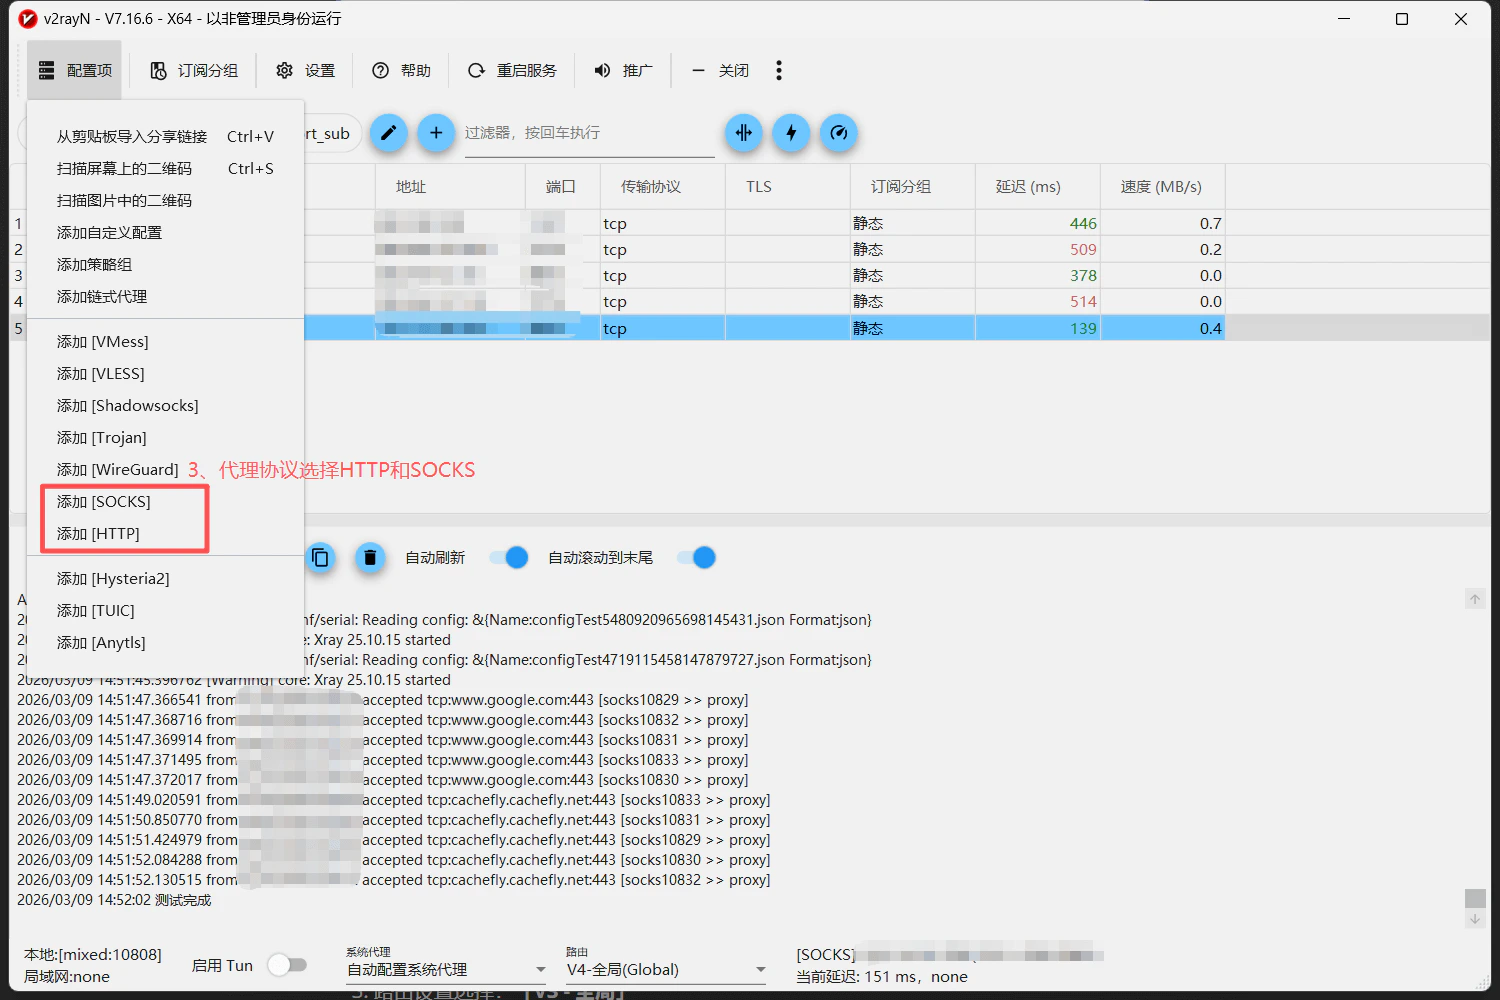
2. Go to the top menu and select **Profiles**
3. Choose the protocol: **HTTP Proxy** or **SOCKS Proxy**
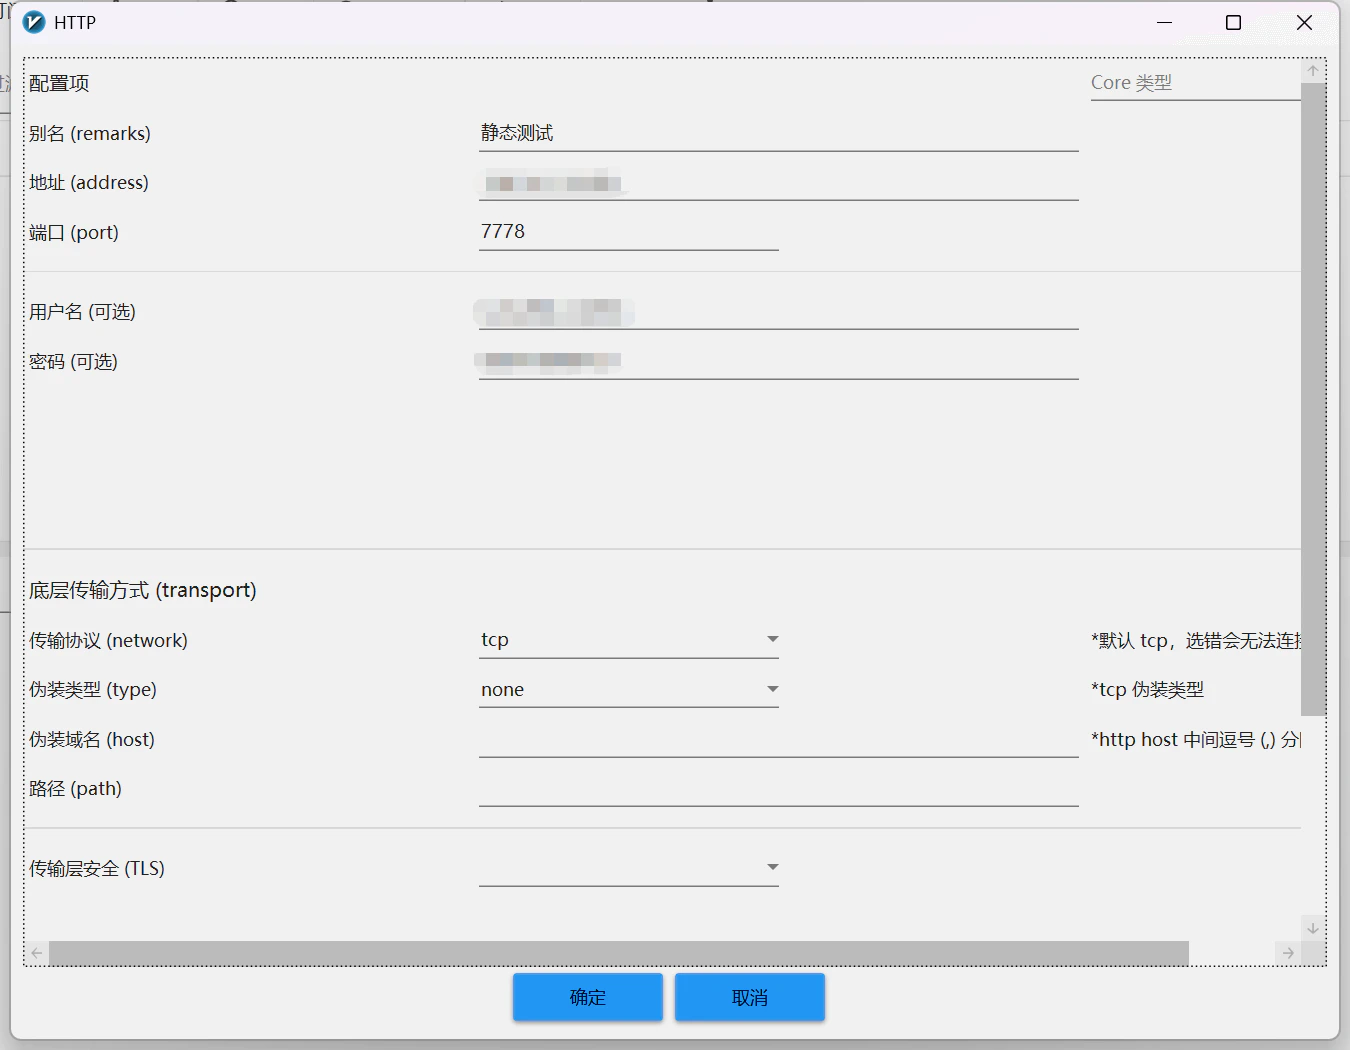
4. Enter the proxy information from Ip2up:
* **Address**: Server address
* **Port**: Proxy service port
* **Username**: Proxy account
* **Password**: Proxy password
**2. Add Proxy Configuration**
1. Select the newly created group
2. Go to the top menu and select **Profiles**
3. Choose the protocol: **HTTP Proxy** or **SOCKS Proxy**
4. Enter the proxy information from Ip2up:
* **Address**: Server address
* **Port**: Proxy service port
* **Username**: Proxy account
* **Password**: Proxy password
 **3. Verify Configuration**
1. Select the group and locate the configured proxy node
2. Right‑click the node and select **Set as Active Proxy**
3. Click **Latency Test**
4. Normal latency and speed values indicate a successful configuration
**3. Verify Configuration**
1. Select the group and locate the configured proxy node
2. Right‑click the node and select **Set as Active Proxy**
3. Click **Latency Test**
4. Normal latency and speed values indicate a successful configuration
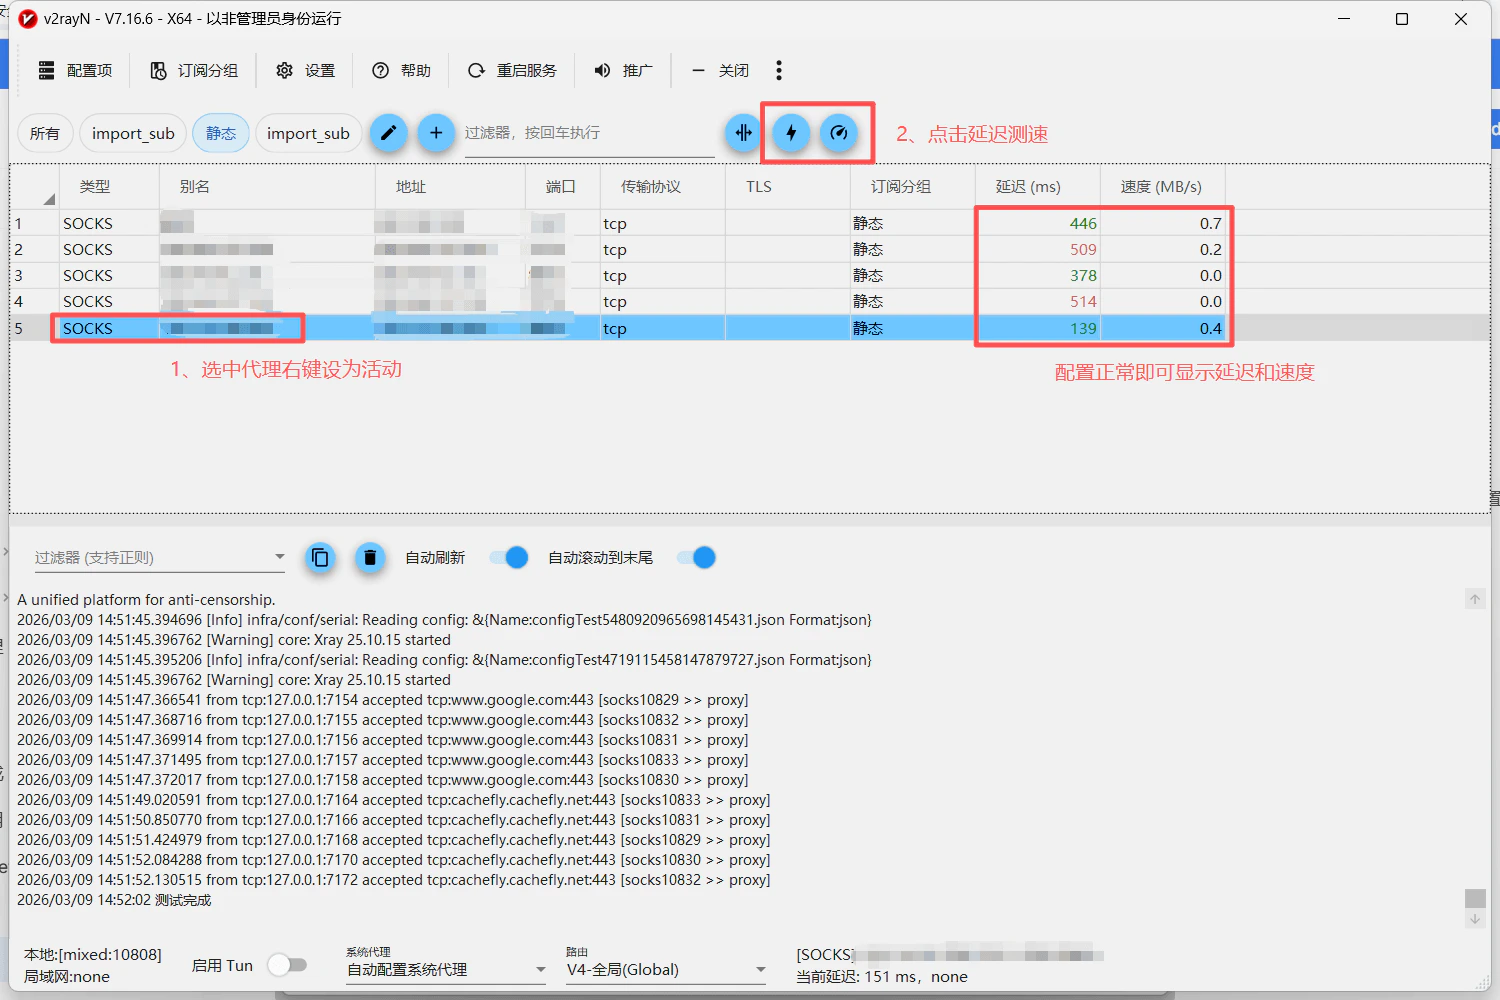 **4. Enable Advanced Features**
1. At the bottom of the v2rayN window, enable **TUN Mode**
2. Set system proxy to **Auto Configure System Proxy**
3. In routing settings, select: **V4 – Global**
* When enabled, the system uses v2rayN as the proxy client
* Traffic type: **global traffic**
4. Start **TUN Mode** to handle traffic via the upper‑layer TUN interface
* In this setup, **Clash Verge** acts as the traffic handler
### Step 3: Clash Verge Configuration
**1. Enable TUN Mode**
1. Open your installed **Clash Verge** client
2. Go to **Network Settings** and turn on **TUN Mode**
**4. Enable Advanced Features**
1. At the bottom of the v2rayN window, enable **TUN Mode**
2. Set system proxy to **Auto Configure System Proxy**
3. In routing settings, select: **V4 – Global**
* When enabled, the system uses v2rayN as the proxy client
* Traffic type: **global traffic**
4. Start **TUN Mode** to handle traffic via the upper‑layer TUN interface
* In this setup, **Clash Verge** acts as the traffic handler
### Step 3: Clash Verge Configuration
**1. Enable TUN Mode**
1. Open your installed **Clash Verge** client
2. Go to **Network Settings** and turn on **TUN Mode**
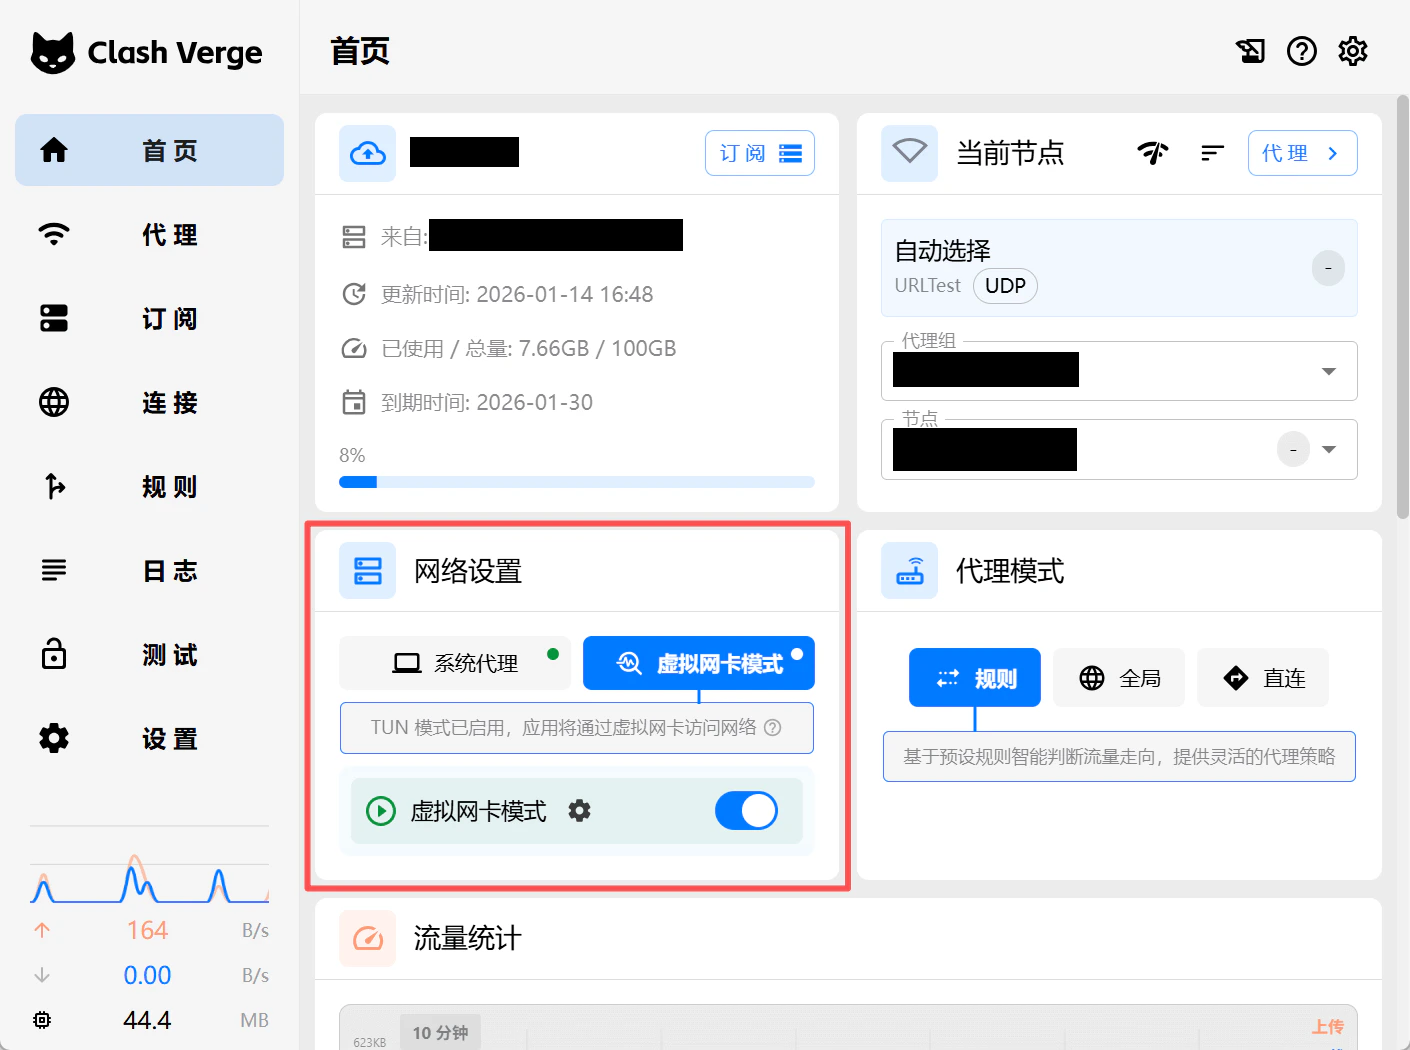 **2. Select Egress Node**
In the Clash Verge node list, select an **overseas node** as the final traffic egress.
### Step 4: Configuration Validation
**Checklist**
* [x] v2rayN proxy information is correct
* [x] v2rayN TUN Mode is enabled
* [x] v2rayN system proxy is set to auto‑configure
* [x] Clash Verge TUN Mode is enabled
* [x] Clash Verge system proxy is disabled
* [x] Clash Verge has selected an overseas egress node
**Verification Method**
Open a browser and visit an IP checking website (such as [ipinfo.io](https://ipinfo.io)). Confirm that the displayed IP address matches the static residential proxy IP you configured.
### Important Notes
1. **Usage Notice**: Ip2up proxy IPs must be used in an overseas network environment. Please prepare the overseas environment in advance.
2. **Software Coordination**: Ensure v2rayN and Clash Verge are configured correctly to avoid functional conflicts.
3. **Traffic Flow**: System traffic path: App → v2rayN → Clash Verge → Overseas Node → Target Website
4. **Performance Impact**: Chained proxies may slightly increase latency. It is recommended to choose low‑latency egress nodes.
✅ You have successfully set up the v2rayN + Clash Verge chained proxy and can now access the network securely using a static residential IP.
**2. Select Egress Node**
In the Clash Verge node list, select an **overseas node** as the final traffic egress.
### Step 4: Configuration Validation
**Checklist**
* [x] v2rayN proxy information is correct
* [x] v2rayN TUN Mode is enabled
* [x] v2rayN system proxy is set to auto‑configure
* [x] Clash Verge TUN Mode is enabled
* [x] Clash Verge system proxy is disabled
* [x] Clash Verge has selected an overseas egress node
**Verification Method**
Open a browser and visit an IP checking website (such as [ipinfo.io](https://ipinfo.io)). Confirm that the displayed IP address matches the static residential proxy IP you configured.
### Important Notes
1. **Usage Notice**: Ip2up proxy IPs must be used in an overseas network environment. Please prepare the overseas environment in advance.
2. **Software Coordination**: Ensure v2rayN and Clash Verge are configured correctly to avoid functional conflicts.
3. **Traffic Flow**: System traffic path: App → v2rayN → Clash Verge → Overseas Node → Target Website
4. **Performance Impact**: Chained proxies may slightly increase latency. It is recommended to choose low‑latency egress nodes.
✅ You have successfully set up the v2rayN + Clash Verge chained proxy and can now access the network securely using a static residential IP.